
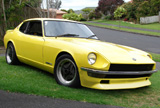
Hello everyone...'71 240Z in Christchurch
-
toycollector10

- Posts: 94
- Location: Christchurch
Update...1st of December 2011
- Attachments
-
- The start of the project.
- 384243_2464965736369_1019034632_2582517_1640685410_n.jpg (104.27 KiB) Viewed 6271 times
-
- 390979_2416167316439_1019034632_2562757_1489109957_n.jpg (134.53 KiB) Viewed 6271 times
-
- Hound #2 supervising the caliper tidy up.
- 378036_2464980336734_1019034632_2582538_2076673882_n.jpg (204.97 KiB) Viewed 6271 times
-
- This is Hi Tech temperature and environment controlled work as you can see.
- 379571_2464978136679_1019034632_2582537_2119543386_n.jpg (100.24 KiB) Viewed 6271 times
-
- There's still heaps to do.
- 383965_2464983576815_1019034632_2582539_173828216_n.jpg (167.72 KiB) Viewed 6271 times
-
toycollector10
- Posts: 94
- Location: Christchurch
When I took the brake drums and wheel cylinders down to Safe 'R Brakes to be restored I was wearing a pair of latex gloves to keep the grease off my hands. The two guys behind the counter sort of looked at each other then at me so I said "I'm a doctor, you know" and snapped the hem of a glove off. Joker number one laughed and said that Joe or whatever his name was, was well overdue for a checkup......we laughed.
Take two, I go back to Safe 'R Brakes with my clutch slave which the mechanic assured me was well gummed up and needed fixing. Standing at the counter, same two comedians on the job and I give it a squeeze. The slave, I mean. It spurts all the hydraulic fluid up onto my chest and arms as it's no longer attached to the locked off hydraulic line. They both look at each other. I said "You'll have a bloody good laugh about this over smoko" and left as fast as I could
Take two, I go back to Safe 'R Brakes with my clutch slave which the mechanic assured me was well gummed up and needed fixing. Standing at the counter, same two comedians on the job and I give it a squeeze. The slave, I mean. It spurts all the hydraulic fluid up onto my chest and arms as it's no longer attached to the locked off hydraulic line. They both look at each other. I said "You'll have a bloody good laugh about this over smoko" and left as fast as I could
-
toycollector10
- Posts: 94
- Location: Christchurch
More pics...
- Attachments
-
- datty 041.jpg (260.04 KiB) Viewed 6171 times
-
- datty 045.jpg (169.47 KiB) Viewed 6171 times
-
- datty 047.jpg (209.68 KiB) Viewed 6171 times
-
- four types of transmissions and two types of differentials and mounts. I've made a few mistakes ordering in parts.
- datty 057.jpg (172.44 KiB) Viewed 6171 times
-
- datty 060.jpg (173.56 KiB) Viewed 6171 times
-
- Does anyone know how to restore the plastic steering wheel rim back to this nice mid brown colour? Mine has gone off to a nasty brown, let's call it poo brown, probably due to sweat and grime etc.
- 240int-L.jpg (96.56 KiB) Viewed 6171 times

Whats your helpers name?
Here's a link for steering wheels. I would do mine if I could just get the thing off.
http://www.classiczcars.com/forums/show ... estoration
Let us know what you did and how it turned out.
Here's a link for steering wheels. I would do mine if I could just get the thing off.
http://www.classiczcars.com/forums/show ... estoration
Let us know what you did and how it turned out.
!972 240z
Retirement is great. Growing old sucks.
Retirement is great. Growing old sucks.
-
toycollector10
- Posts: 94
- Location: Christchurch
Thanks for the link. Cherry wood stain appears to be the key, something I hadn't thought of at all. The wheel rim appears to be a plastic casting with applied wood-grain effect. I'll post up some more pictures as I make progress on it. My dog is Fi Fi La Poodle, AKA Phoebe. My other Poodle is Polly and she features at the end of the video below, if anyone is interested...
http://www.youtube.com/profile?user=toy ... 4FJwIpf7xA
http://www.youtube.com/profile?user=toy ... 4FJwIpf7xA
-
toycollector10
- Posts: 94
- Location: Christchurch
Just drop in to your local garage and they will have it off in a jiffy. If they can't get if off with a short sharp knock in the right place and at the right angle some workshops have a tool that looks like a gear puller. The center bolt is placed against the top of the splined shaft and the two arms out to the side go behind the centre boss and it's an easy job just to wind it off until it pops and breaks the sticking point.us2 wrote:Here's a link for steering wheels. I would do mine if I could just get the thing off.
-
toycollector10
- Posts: 94
- Location: Christchurch
I cleaned the rim by soaking it in hot water then using very fine grade wet and dry sandpaper followed up by 000 grade oil free steel wool
- Attachments
-
- 12.12.11 004.jpg (205.47 KiB) Viewed 6076 times
-
toycollector10
- Posts: 94
- Location: Christchurch
Then I bought these colours but they were hopeless really. And just about every picture of a Z1 steering wheel on a Zed car is the same, poo brown.
- Attachments
-
- 12.12.11 005.jpg (239.88 KiB) Viewed 6074 times
-
toycollector10
- Posts: 94
- Location: Christchurch
One of the forums www.jdm-car-parts.com recommended acrylic clear so I ran with it and the job came out not too bad, overall.
This is coat number one. I followed up with three more with a light rub down with oil free 000 grade steel wool in between.
This is coat number one. I followed up with three more with a light rub down with oil free 000 grade steel wool in between.
- Attachments
-
- 12.12.11 007.jpg (144.07 KiB) Viewed 6072 times
-
- 12.12.11 010.jpg (149.97 KiB) Viewed 6072 times
-
- 12.12.11 014.jpg (321.48 KiB) Viewed 6072 times
Last edited by toycollector10 on Wed Dec 14, 2011 6:50 am, edited 2 times in total.
-
toycollector10
- Posts: 94
- Location: Christchurch
The job's nearly done now. Just waiting for the Kumho's to arrive for fitting, a wheel alignment and road test and she's all back to me. Hopefully.
- Attachments
-
- 12.12.11 023.jpg (235.51 KiB) Viewed 6071 times
-
- 12.12.11 021.jpg (169 KiB) Viewed 6071 times

Hey Dad,
It's lookin' so good I had to join up and say so!
You going to let me drive it come my 25th?
Cheers,
Alex
It's lookin' so good I had to join up and say so!
You going to let me drive it come my 25th?
Cheers,
Alex
Wanted to buy: Seiko diver's watch or Seiko GS watch